Month: October 2016
Installing RTL-SDR (RTL2832U) driver
This content is a piece of our initiative to explain how to start your studies with RTL-SDR.
In this post we’ll explain about how to install the rtl-sdr driver.
To install the RTL-SDR device on a Linux computer is relatively quick and easy.
These instructions are designed to run on Linux distributions based on Debian or Ubuntu.
Installing the drivers:
1. Open the terminal and make sure you are in the home directory.
2. Update your Linux distribution:
sudo apt-get update
3. Install the necessary tools such as: git, cmake, build-essential
sudo apt-get install git
sudo apt-get install cmake
sudo apt-get install build-essential
4. Install the library called “libusb-1.0-0-dev” which provides access to USB devices.
sudo apt-get install libusb-1.0-0-dev
5. Download and install the RTL2832U from vendor site:
git clone git://git.osmocom.org/rtl-sdr.git
cd rtl-sdr/
mkdir build
cd build
cmake ../ -DINSTALL_UDEV_RULES=ON
make
sudo make install
sudo ldconfig
sudo cp ../rtl-sdr.rules /etc/udev/rules.d/
6. Create a “blacklist” to the default driver which loads automatically using the RTL-SDR device as a TV receiver, because this isn’t the functionality we want to use (tv receiver).
A. Access as administrator the directory: /etc/modprobe.d
B. Create a new file called “blacklist-rtl.conf” and add the following line in the file:
blacklist dvb_usb_rtl28xxu
blacklist rtl2832
blacklist rtl2830
C. Save the file and reboot the machine.
7. After reboot the machine, test if the device is actually running. To test type the follow command in the terminal:
rtl_test -t
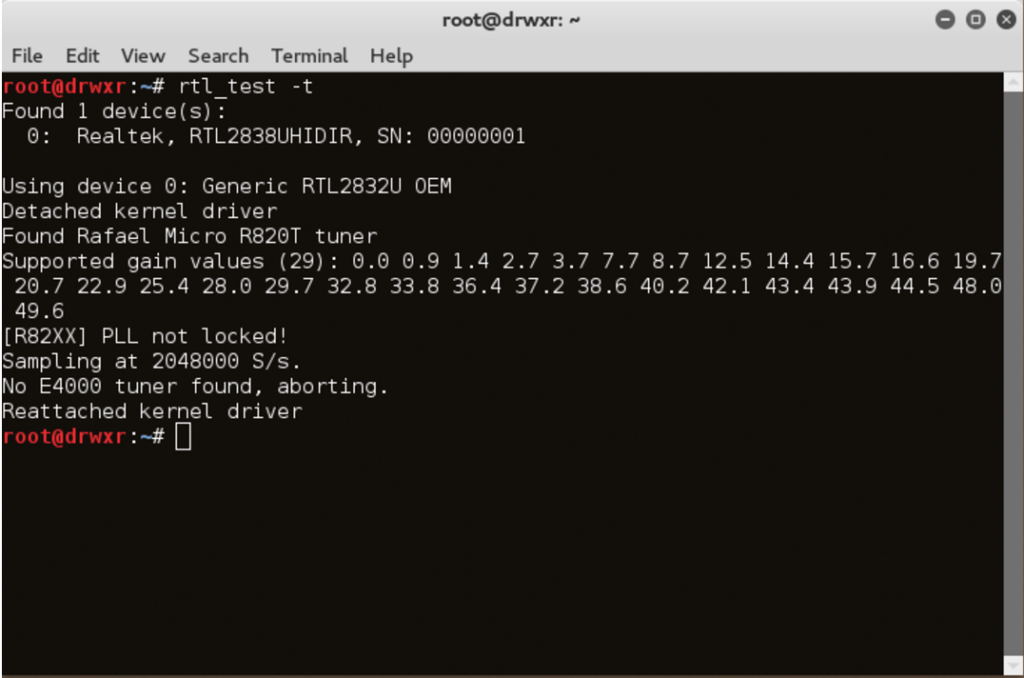
Don’t worry with the follow messages:
“PLL not locked”
“No E4000 tuner found, aborting”.
If you see these messages above it is a sign that your driver and your device is working properly and you are ready to install some applications like GQRX, Dump1090, CubicSDR and others…
FM transmitter through a Raspberry pi
In this post we’ll turn the Raspberry Pi into an FM transmitter in a few steps.
ATTENTION: remember that in some countries the radio transmissions of any kind are subject to federal laws and regulations.
This is a simple and very interesting article.
To turn your raspberry pi in FM transmitter we will use the rpitx of F5OEO (https://github.com/F5OEO/rpitx) , rpitx is a radio transmitter for Raspberry Pi (B, B+, PI2, PI3 and PI zero) that transmits RF directly to GPIO. It can handle frequencies from 5 KHz up to 500 MHz.
For installing do the following:
git clone https://github.com/F5OEO/rpitx
cd ./rpitx
sudo ./install.sh
The install script (install.sh) will download and install all the needed dependencies. This takes a while.
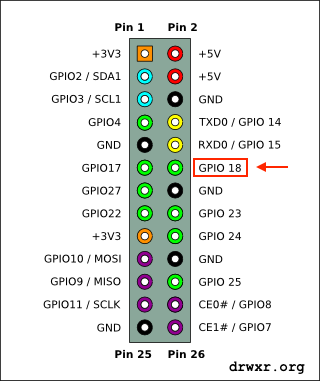
We gonna connect a ~20cm or so plain wire to GPIO 18 (which is pin 12 on header P2) to act as an antenna, and tune an FM radio.
The optimal length of the wire depends the frequency you will want to transmit.
GPIO pins (General Purpose Input/Output) are ports (pins) programmable that can be used to input and/or output data. They are mainly used to communicate with external devices like microcontroller or microprocessor.

In this article we going to transmit FM, so we gonna use the pifm.
Pifm converts an audio file (Wav, 48KHz, 1 channel, pcm_s16le codec) to Narrow band FM (12.5khz excursion) and outputs it to a .ft file. Assuming your audio file is in your current working directory.
./pifm gunsnroses.wav fm.ft
Then after execute the command that created the fm.ft, lets execute the command bellow that will transmit the audio at 92.0MHz (you can change).
sudo ./rpitx -m RF -i fm.ft -f 92000 -l
Video: