FM transmitter through a Raspberry pi
In this post we’ll turn the Raspberry Pi into an FM transmitter in a few steps.
ATTENTION: remember that in some countries the radio transmissions of any kind are subject to federal laws and regulations.
This is a simple and very interesting article.
To turn your raspberry pi in FM transmitter we will use the rpitx of F5OEO (https://github.com/F5OEO/rpitx) , rpitx is a radio transmitter for Raspberry Pi (B, B+, PI2, PI3 and PI zero) that transmits RF directly to GPIO. It can handle frequencies from 5 KHz up to 500 MHz.
For installing do the following:
git clone https://github.com/F5OEO/rpitx
cd ./rpitx
sudo ./install.sh
The install script (install.sh) will download and install all the needed dependencies. This takes a while.
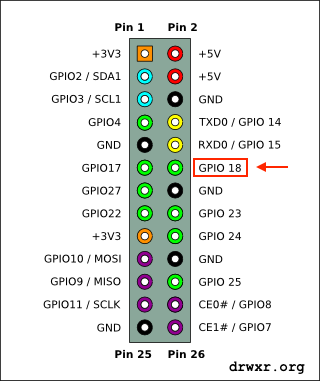
We gonna connect a ~20cm or so plain wire to GPIO 18 (which is pin 12 on header P2) to act as an antenna, and tune an FM radio.
The optimal length of the wire depends the frequency you will want to transmit.
GPIO pins (General Purpose Input/Output) are ports (pins) programmable that can be used to input and/or output data. They are mainly used to communicate with external devices like microcontroller or microprocessor.

In this article we going to transmit FM, so we gonna use the pifm.
Pifm converts an audio file (Wav, 48KHz, 1 channel, pcm_s16le codec) to Narrow band FM (12.5khz excursion) and outputs it to a .ft file. Assuming your audio file is in your current working directory.
./pifm gunsnroses.wav fm.ft
Then after execute the command that created the fm.ft, lets execute the command bellow that will transmit the audio at 92.0MHz (you can change).
sudo ./rpitx -m RF -i fm.ft -f 92000 -l
Video: