Category: raspberry pi
Setting up RTL-SDR on Raspberry Pi 3
This post presents the RTL-SDR setup on Raspberry Pi 3 with Raspbian

Setting up the environment
Open the terminal, then:
pi@raspberrypi:~ $ sudo apt-get install gnuradio % take some time to install all packages
pi@raspberrypi:~ $ gnuradio-companion % if it opens the gnuradio-companion, everything is ok
Installing RTL-SDR and gr-osmosdr packages
pi@raspberrypi:~ $ sudo apt-get install rtl-sdr gr-osmosdr
After successfully installing the packages, plug the RTL-SDR to the Raspberry Pi 3 USB Port, then list the USB devices connected to the Raspberry Pi 3:
pi@raspberrypi:~ $ lsusb
Look for Realtek device (RTL), in my case “Realtek Semiconductor Corp. RTL2838 DVB-T”:

Now it is time to check if RTL-SDR is working:

In my case it is working by the first time on Raspberry Pi 3, but there is a known issue (on Ubuntu) related to driver conflict (it uses the Digital TV Driver – dvb_usb_rtl28xxu), if this is your case, do the following:
pi@raspberrypi:~ $ sudo rmmod dvb_usb_rtl28xxu % to make this fix permanent, you have to move driver dvb_usb_rtl28xxu to blacklist
and, try again:
pi@raspberrypi:~ $ rtl_test
Testing time 🙂
Install the GQRX, through apt-get:
pi@raspberrypi:~ $ sudo apt-get install gqrx-sdr
Then run GQRX:
pi@raspberrypi:~ $ gqrx
If not asked to select I/O Device, go to “File” > “I/O Devices” then select Realtek RTL-SDR, now you can click “Power” button then you can hear noise and see FFT live graph (up) and waterfall live graph (bottom).
Pay attention:
Due to processing limitations from Raspberry Pi, to avoid crashes, you have to reduce the sample rate for GQRX, to do it go to: “File” > “I/O Devices” > “Sample Rate” or edit /home/pi/.config/gqrx/default.conf
RTL-SDR known to works up to 2.4 Msps on Raspberry Pi 3 and up to 1.44 Msps on Raspberry Pi 2.
In most cases you can reduce the CPU load further by reducing the window size, sample rate, FFT rate and FFT size (try 2048 at 10-15 Hz). If you are only interested in the FFT, set Mode to “Demod Off”. This will greatly reduce the CPU load.

Another option due to GQRX limitation on Raspberry Pi, you could try QTCSDR on GitHub that also allows TX through GPIO 18 (rpitx), but now just to check RX function:
- git clone https://github.com/ha7ilm/qtcsdr
- cd qtcsdr
- ./rpi-install.sh
- ./rpi-test.sh
If rpi-test.sh succeeds, then type qtcsdr on command line.
pi@raspberrypi:~ $ qtcsdr

Congratulations, your RTL-SDR is working on Raspberry Pi 3! Now you can use available SDR tools on Raspberry Pi 3.
FM transmitter through a Raspberry pi
In this post we’ll turn the Raspberry Pi into an FM transmitter in a few steps.
ATTENTION: remember that in some countries the radio transmissions of any kind are subject to federal laws and regulations.
This is a simple and very interesting article.
To turn your raspberry pi in FM transmitter we will use the rpitx of F5OEO (https://github.com/F5OEO/rpitx) , rpitx is a radio transmitter for Raspberry Pi (B, B+, PI2, PI3 and PI zero) that transmits RF directly to GPIO. It can handle frequencies from 5 KHz up to 500 MHz.
For installing do the following:
git clone https://github.com/F5OEO/rpitx
cd ./rpitx
sudo ./install.sh
The install script (install.sh) will download and install all the needed dependencies. This takes a while.
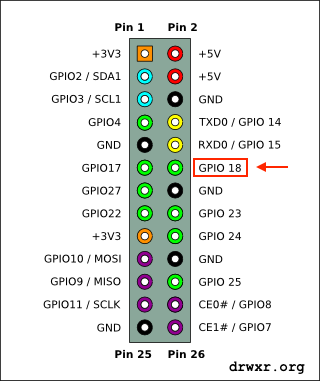
We gonna connect a ~20cm or so plain wire to GPIO 18 (which is pin 12 on header P2) to act as an antenna, and tune an FM radio.
The optimal length of the wire depends the frequency you will want to transmit.
GPIO pins (General Purpose Input/Output) are ports (pins) programmable that can be used to input and/or output data. They are mainly used to communicate with external devices like microcontroller or microprocessor.

In this article we going to transmit FM, so we gonna use the pifm.
Pifm converts an audio file (Wav, 48KHz, 1 channel, pcm_s16le codec) to Narrow band FM (12.5khz excursion) and outputs it to a .ft file. Assuming your audio file is in your current working directory.
./pifm gunsnroses.wav fm.ft
Then after execute the command that created the fm.ft, lets execute the command bellow that will transmit the audio at 92.0MHz (you can change).
sudo ./rpitx -m RF -i fm.ft -f 92000 -l
Video: